Saturday, October 8, 2016

Hazardous Material Placecards


Facilities and vehicles that store, use and/or transport hazardous materials (hazmats) will display
placards that signify the types of material contained and its hazard.

Identifying Hazmats in Fixed Facilities
The National Fire Protection Association (NFPA) 704 Diamond is often used to warn of hazmat inside fixed facilities (e.g., workplaces).

NFPA 704 Diamonds are divided into four colored quadrants, each with a rating number inside that  indicates the degree of risk associated with the material.  The higher the number, the higher the risk.


If you see a hazmat placard, STOP and call 911 for assistance.  When necessary, evacuate people who are downwind to an uphill and upwind location.


Identifying Hazmats in Transit
When in transit, hazmat containers must be labeled with the type of substance contained and its hazard risk.  There are 3 systems for displaying and identifying the hazmat being transported:


  1. Department of Transportation (DOT) warning placards
  2. The United Nations system
  3. The North American


The DOT warning placards are the most widely used system.


Hazmat Prodedures
In the event of a hazmat release:

  1. Stay upwind.
  2. Call 911 for assistance.
  3. If authorities cannot be reached, evacuate people and isolate the area.
  4. Do not attempt to rescue any injured persons until the situation has been assessed.
  5. Do not walk into or touch any spilled material.  Avoid inhaling fumes, smoke and vapors.


Monday, August 8, 2016

CERT Refresher Courses

I am happy to announce that our free CERT refresher has moved to Anderson Foothill Library 1135 S 2100 E, Salt Lake City, UT 84108. This class will be held in the large downstairs meeting room. The information covered in these classes is from the 2011 version of the CERT manual, with some location specific material.                  

Here is the schedule for the remainder of 2016:
                                         
Sat. Aug. 13      Disaster Preparedness       10 am to noon
Sat. Sept. 10     Fire Suppression               10 am to noon
Sat. Oct. 8        Disaster Medical part 1      10 am to noon
Sat. Nov. 12      Disaster Medical part 2        2 pm to 4 pm
Sat. Dec. 10      Light Search and Rescue   10 am to noon
                                                                                     
Susan Collier
S.E. CERT Division Supervisor
Salt Lake City Emergency Management
Susan.Collier@slcgov.com
801.513.4848

Thursday, January 28, 2016

CERT Refresher Classes

CERT Refresher Classes

Come enjoy free classes that could save a life on the 4th Saturdays, January through August 2016. These classes are refreshers for CERT-trained individuals sponsored by Salt Lake City Community Emergency Response Teams (CERT) and SLC Emergency Management. All CERTs are welcome. No pre-registration is required.

Place:           SLC Sprague Library (slcpl.org),
                     2131 South 1100 East, Salt Lake City, UT
                     Downstairs Meeting Room (elevator available)

Time:           10 a.m. to 12 p.m.


Dates and Topics: 

January 30                      Disaster Preparedness
February 27                     Fire Safety and Utility Controls
March 26                         Disaster Medical Part 1
April 30                            Disaster Medical Part 2
May 28                            Light Search & Rescue Operations
June 25                           CERT Organization
July 30                            Disaster Psychology / Terrorism & CERT
August 27                        Disaster Preparedness (repeat)


Do you know someone that is CERT trained? Share this with them.

-------------------------------------------------------------

For more information about . . .

Topic Descriptions:
          http://www.bereadyslc.com/go/doc/6354/2122646/
                           Note that this page talks about the full CERT course taught in
                           Salt Lake City, which requires a fee.

Disaster Preparedness: 
           www.BeReadySLC.com

S.A.F.E. Neighborhoods Program: 
          http://www.safeutah.org/

Facebook Group, S.A.F.E. Neighborhoods Program: 
          https://www.facebook.com/SAFE-Neighborhoods-808914279139508/?fref=ts

Facebook Group, Salt Lake City Emergency Management:  
          https://www.facebook.com/SLC-Emergency-Management-1446831312218423/?fref=nf

Facebook Group, Salt Lake City CERT by Susan Collier, 
SLC Southeast Division Volunteer Supervisor:
         https://www.facebook.com/SLCCERT/

Saturday, May 23, 2015

Radio Use


Before venturing out, test the radios in your group to make sure they all work and that everyone can communicate using them.

Remember to always check the battery levels to ensure you have enough battery power for the duration you need to be in contact.

Team members will functional needs will require radios and/or services that enable accessibility.

Receiving Messages

  1. Listen carefully, especially to messages.
  2. Acknowledge all transmissions address to you.


Transmitting Messages

  1. Do not interrupt another person's message.
  2. Identify yourself when talking.
  3. When talking, hold the radio close to your mouth with the antenna vertical.
  4. Speak clearly and slowly.
  5. Use the phonetic alphabet to spell out words.
  6. Keep transmissions short -- about 10 seconds.


Team members who are deaf or hard of hearing will need a radio with assistive technology (e.g., a radio with text messaging capability) or the services of a sign language interpreter.


Monday, April 13, 2015

Treating Drinking Water

If you have doubts about the quality of water, treat it before drinking.

Water Purification
Water can be purified for drinking, cooking and medical use by heating it to a rolling boil for 1 minute or by using water purification tablets or liquid bleach.

Liquid Bleach (unscented)
Following the ratios in the tables below, add bleach to the water and let it stand for 30 minutes.  If the solution does not smell or taste of bleach, add another 6 drops of bleach and let the solution stand for 15 minutes before consuming/using.


These ratios are for normal bleach solutions (4% - 6% chlorine).  Adjust ratios as necessary if using higher concentration solutions.


Use only purified water on wounds.  The use of other solutions(e.g., hydrogen peroxide) on wounds must be the decision of trained medical personnel.


Information obtained from Salt Lake CERT Field Operations Guide.


Saturday, February 7, 2015

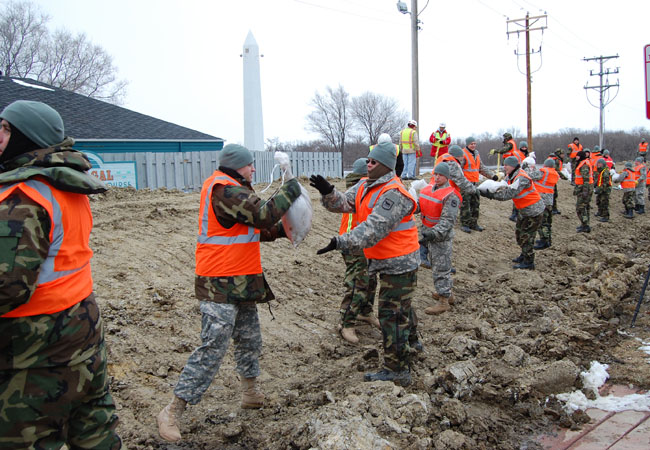
Sandbagging

Use sandbags to form barriers that prevent flood water from entering spaces.


Filling Sandbags


  1. Team member 1 holds and empty sandbag open on the ground in front of his or her feet.
  2. Team member 2 empties shovelfuls of sand (or dirt or gravel) into the open bag, until the bag is 1/3 to 2/3 full.
  3. Team member 3 stacks and stockpiles the filled sandbags.


Sandbags do not need to be tied, although they can be tied loosely at the top.  Untied sandbags form a tighter seal when stacked.

For larger operations, bag-holding racks, funnels on the back of trucks and other power-loading equipment (if available) may be used to speed the process.


*******************************


Moving Sandbags

Sandbags are typically moved using a passing line.

To set up a diagonal-passing line:
  1. Team members stand side-by-side in a line.
  2. every second team member takes a small step back.
  3. Unmoved team members turn around to face the members who took a step back.

Use your knees and not your back when lifting sandbags.

When constructing a barrier on an incline, taller team members should be at the end of the line that is farthest from the barrier.


*******************************


Building a Sandbag Barrier


  1. Clear any debris from the area where sandbags are to be placed.
  2. Dig a trench for to six inches deep and two sandbags wide.
  3. Line the trench with heavy duty plastic (poly), extending the plastic across the trench and away from the bottom row of sandbags and toward the water.
  4. Place a row of sandbags length-ways and parallel to the direction of the flow around the edge of the plastic to anchor it.  Overlap sandbags, tucking the open end under the bottom end of the next sandbag.
  5. Stagger the second layer of bags perpendicular to the first layer.  Layer the barrier like a bric wall with each sand bag overlapping the one below by half.
  6. Stamp sandbags firmly into place to eliminate gaps and create a tight seal.
  7. Roll the plastic over the anchoring row of sandbags and anchor again.
  8. Place additional layers of sandbags in alternating directions.
  9. Once the barrier is at the appropriate level, fold the plastic over the top of the barrier and anchor it with extra sandbags.

Barriers more than three layers high should be layered in a pyramid structure using a ratio of 3:1.  For every foot in height, the base must be three feet wide.

Information obtained from Salt Lake CERT Field Operations Guide.


Tuesday, January 20, 2015

Gas Meter and Shutoff Valve


In the event of an emergency, locate the main gas service shutoff valve and shut off the gas.  Main gas shutoff valves are normally located near the gas meter

Outside Meters

  • Gas meters and gas service shutoff valves are usually located on the side or in front of a building.


Cabinet Meters

  • In some cases, gas meters may be located in a cabinet enclosure built into the building or located inside the building, with the shutoff valve located outside on a section of gas pipe next to the building.


Gas Shutoff

  1. Use a non-sparking wrench to turn the valve clockwise one-quarter turn.
  2. Valve is closed when it is crosswise to the pipe

Gas Turn-on

Natural gas flow should only be turned on by a licensed technician


Do not shut off the gas unless you:

            smell gas, hear gas escaping, 
                             see a broken gas line or
                                            suspect a gas leak.


If you are unsure whether a gas meter has a shutoff device, contact the gas service company.

Information obtained from Salt Lake CERT Field Operations Guide.


Saturday, January 3, 2015

Electric Utility ShutOff

Electricity Shutoff

In the event of an electrical emergency, locate the circuit breakers or fuses and shut off the power.


Circuit Box

  1. Switch off individual breakers
  2. Switch off main breaker

Fuse Box

  1. Unscrew and pull out individual fuses
  2. Pull out main fuse block -- Use caution:  metal parts may be hot.


Electricity Turn-on

When turning the power back on turn on the main switch or breaker first, then screw in the fuses or switch on the smaller breakers, one at a time


Do Not Enter a flooded basement or standing water to shut off the electrical supply.  Water conducts electricity and you could be electrocuted.


Information obtained from Salt Lake CERT Field Operations Guide.


Thursday, January 1, 2015

How To Size-Up

Photo from www.ci.richmond.ca.us/index.aspx?NID=2344

Before responding to a disaster, size up the situation.  Size-up is a continual process of examining and evaluation the damage in an environment.  It will enable you to make decisions and respond appropriately in the areas of greatest need.


CERT Size-up Steps

1.  Gather facts
    • What has happened?
    • How many people appear to be involved?
    • What is the current situation

2.  Assess and communicate the damage

    • What has happened?
    • What is happening?
    • What could happen (i.e., how bad could things get)?

3.  Consider probabilities

    • What is likely to happen?
    • What could happen through cascading events?

4.  Assess your own situation
    • Are you in immediate danger?
    • Have you been trained to handle the situation?
    • Do you have the equipment that you need?

5.  Establish priorities

    • Are lives at risk?
    • Can you help?  Remember, life safety is the first priority!

6.  Make decisions

    • Base your decisions on an assessment of the situation and in accordance with the priorities that you established.

7.  Develop a plan of action

    • Create a plan that will achieve your priorities
    • Simple plans may be verbal, but always write down more complex plans.

8.  Take action

    • Execute your plan, documenting any deviations and status changes so that you can report the situation accurately to first responders.

9.  Evaluate progress

    • Evaluate your progress in accomplishing the objectives in your plan of action to determine what is working and what changes you may have to make to stablize the situation.


Information obtained from Salt Lake CERT Field Operations Guide


Saturday, January 11, 2014

Tips for First Responders

Whether you are responding to an emergency caused by natural forces such as a fire, flood or tornado, or
one caused by a terrorist attack, you will likely encounter persons with some type of disability who will require special assistance.  Some disabilities will be obvious.  Other disabilities, including some cognitive disabilities, mental illness or multiple chemical sensitivities, are difficult or impossible to detect.

The Center for Development and Disability has produced these pages as quick, easy-to-use procedures for assisting persons with disabilities during emergencies as well as during routine encounters.  They are not meant to be comprehensive, but contain specific information that can be read quickly either before or while they are responding to an incident.

Click on the link below to access the pages:


Monday, December 23, 2013

Burns: First Aid - MayoClinic.com

This information posted from www.MayoClinic.com.  Click on the link for additional information:


To distinguish a minor burn from a serious burn, the first step is to determine the extent of damage to body tissues. The three burn classifications of first-degree burn, second-degree burn and third-degree burn will help you determine emergency care.

1st-degree burn
The least serious burns are those in which only the outer layer of skin is burned, but not all the way through.

  • The skin is usually red
  • Often there is swelling
  • Pain sometimes is present

Treat a first-degree burn as a minor burn unless it involves substantial portions of the hands, feet, face, groin or buttocks, or a major joint, which requires emergency medical attention.

2nd-degree burn
When the first layer of skin has been burned through and the second layer of skin (dermis) also is burned, the injury is called a second-degree burn.

  • Blisters develop
  • Skin takes on an intensely reddened, splotchy appearance
  • There is severe pain and swelling.

If the second-degree burn is no larger than 3 inches (7.6 centimeters) in diameter, treat it as a minor burn. If the burned area is larger or if the burn is on the hands, feet, face, groin or buttocks, or over a major joint, treat it as a major burn and get medical help immediately.

For minor burns, including first-degree burns and second-degree burns limited to an area no larger than 3 inches (7.6 centimeters) in diameter, take the following action:

  • Cool the burn. Hold the burned area under cool (not cold) running water for 10 or 15 minutes or until the pain subsides. If this is impractical, immerse the burn in cool water or cool it with cold compresses. Cooling the burn reduces swelling by conducting heat away from the skin. Don't put ice on the burn.
  • Cover the burn with a sterile gauze bandage. Don't use fluffy cotton, or other material that may get lint in the wound. Wrap the gauze loosely to avoid putting pressure on burned skin. Bandaging keeps air off the burn, reduces pain and protects blistered skin.
  • Take an over-the-counter pain reliever. These include aspirin, ibuprofen (Advil, Motrin, others), naproxen (Aleve) or acetaminophen (Tylenol, others). Use caution when giving aspirin to children or teenagers. Though aspirin is approved for use in children older than age 2, children and teenagers recovering from chickenpox or flu-like symptoms should never take aspirin. Talk to your doctor if you have concerns.

Minor burns usually heal without further treatment. They may heal with pigment changes, meaning the healed area may be a different color from the surrounding skin. Watch for signs of infection, such as increased pain, redness, fever, swelling or oozing. If infection develops, seek medical help. Avoid re-injuring or tanning if the burns are less than a year old — doing so may cause more extensive pigmentation changes. Use sunscreen on the area for at least a year.

Caution


  • Don't use ice. Putting ice directly on a burn can cause a person's body to become too cold and cause further damage to the wound.
  • Don't apply egg whites, butter or ointments to the burn. This could cause infection.
  • Don't break blisters. Broken blisters are more vulnerable to infection.

3rd-degree burn
The most serious burns involve all layers of the skin and cause permanent tissue damage. Fat, muscle and even bone may be affected. Areas may be charred black or appear dry and white. Difficulty inhaling and exhaling, carbon monoxide poisoning, or other toxic effects may occur if smoke inhalation accompanies the burn.


FOR MAJOR BURNS, CAL 911 OR EMERGENCY MEDICAL HELP.

Until an emergency unit arrives, follow these steps:

  • Don't remove burned clothing. However, do make sure the victim is no longer in contact with smoldering materials or exposed to smoke or heat.
  • Don't immerse large severe burns in cold water. Doing so could cause a drop in body temperature (hypothermia) and deterioration of blood pressure and circulation (shock).
  • Check for signs of circulation (breathing, coughing or movement). If there is no breathing or other sign of circulation, begin CPR.
  • Elevate the burned body part or parts. Raise above heart level, when possible.
  • Cover the area of the burn. Use a cool, moist, sterile bandage; clean, moist cloth; or moist cloth towels.
Get a tetanus shot. Burns are susceptible to tetanus. Doctors recommend you get a tetanus shot every 10 years. If your last shot was more than five years ago, your doctor may recommend a tetanus shot booster.


Sunday, October 20, 2013

CERT Vests


Looking to upgrade your CERT or Amateur Radio vest to a more tactical look and function.  Check out the website link below and see ALL the options available!


Thursday, September 26, 2013

2013 Multi-CERT Event

The 2013 Multi-CERT Exercise and Training


September 28th, 2013 from 9am to 1pm

Taylorsville Senior Center
4743 S. Plymouth View Drive,
Taylorsville, Utah


Three Skills Modules: 
Search & Triage 
Rescue & Transport 
Disaster Medical 

Each module includes: 
Team Mentoring 
Just-In-Time Training 
Team Assignment Briefing 
Simulated Disaster Scenario 
Team De-briefing & Review


PARTICIPATING TEAMS 
& ORGANIZATIONS: 
Taylorsville City (host),
Bluffdale, Cottonwood Heights, Draper, Herriman, Lehi, Murray, 
Pleasant Grove, Salt Lake City, SLCC, Salt Lake County, Sandy, Saratoga Springs, 
South Salt Lake, West Valley, Brothers Grimm, SLCo Medical Reserve Corps, 
LDS Church, Southern Baptist Church,
Utah Division of Emergency Management

For more information and to register, click on the following link:


Tuesday, August 27, 2013

Traumatic Stress Management for Parents

The magnitude of death and destruction in an event require special attention to communicating with children and adolescents. Physical safety and security takes priority.

It is difficult to predict the kinds of psychological problems that children and adolescents will have, however, the following management plan may help minimize later difficulties:

  • Your response to the disaster will affect your child’s response, therefore, it is helpful to discuss your own reactions with another adult before talking with your children.
  • Discuss the event in an open honest manner with your children. Children might want to talk intermittently, and younger children might need concrete information to be repeated.
  • Be available for your child.
  • Limit the times of exposure to television or other sources on information about the disaster and its victims.
  • Engage your child in conversation of their choosing-not necessarily about their feelings or the scene. Talking about the normal events of life is central to health.
  • Maintain daily routines to the extent possible. For children school is an important part of feeling safe and normal.
  • Increase your child’s sense of control and mastery within the household-let him or her plan dinner or the evening’s activities.
  • Every child has a different way of responding to trauma. It is not advisable to require the same response of everyone. Listen to your child’s stories.
  • Now is not the time to introduce new routines. Familiar schedules and bedtime stories can be reassuring.
  • Reassure your children that the disaster was not their fault in any way.
  • Older children and adolescents may feel “stirred up”. Helping them understand their behavior and setting limits can help.
  • Some children may respond with a return to old behaviors, such as a loss of toilet training, or inability to fall asleep alone. These should be tolerated and understood.
  • Help your child modulate the extent to which they personalize or identify with the victims or the situation. Remind your children that they are safe and with you.
  • Provide concrete information to your child about how she/he differs from the people in the accident to decrease over-identifying with the victims.
Disaster Response Education and Training Project, Center for the Study of Traumatic Stress.

Wednesday, July 31, 2013

Sunday, July 14, 2013

Cribbing

Cribbing is essential in many extrication operations.  Its most common use is to stabilize objects.  Wood selected for cribbing should be solid, straight and free of major flaws such as large knots or splits.  Cribbing surfaces should be free of any paint or finish because this can make the wood slippery, especially when it is wet.  Cribbing can be made out of pieces of timber found in the debris and cut to size.  Pieces of 2X2 (5 cm X 5 cm) and 4X4 (10 cm X 10 cm) as well as wedges cut in this size timber are very useful.

Cribbing involves multiple pieces of wood laid on the side and crossed.  It spreads the load well and has many load transfer surfaces.  It also has lateral stability depending on the ratio of width to height.  The height should not be more that three times the width.  (Note:  pieces should not be more that two feed (60 cm) long.)

The overhand at corners should be no less than 4 inches.

4X4 crib capacity = 24,000 lb. (10,886 kg).


6X6 crib capacity = 60,000 lb. (27,215.5 kg).

Note:  using 3 pieces per layer as in 3X3 (7.5 cm X 7.5 cm) cross tie will double the capacity


Sunday, June 2, 2013

CERT Bag Items added to "Documents" tab

I have wondered for a long time what items are recommended for a CERT bag and now I have found one on the net that I really like.  I have posted what I found under 2 links in the "Documents" tab of the blog, and have also included them below.

Tuesday, April 23, 2013

Updated CERT Training Dates

New courses for Salt Lake City CERT training start May 7, 8 and 9 are posted under the CERT Training tab above.

To register for a class, visit www.slccert.org.


Thursday, February 7, 2013

CERT Radio Training

Check out this website put on by the FCC Public Safety and Homeland Security Bureau regarding CERT radio training.  This training is used by CERT Teams in Fairfax County, Virginia and in the Washington, D.C. area.

There are a couple of power points and also an activity to conduct for training.


CERT Radio Training