Saturday, May 23, 2015

Radio Use


Before venturing out, test the radios in your group to make sure they all work and that everyone can communicate using them.

Remember to always check the battery levels to ensure you have enough battery power for the duration you need to be in contact.

Team members will functional needs will require radios and/or services that enable accessibility.

Receiving Messages

  1. Listen carefully, especially to messages.
  2. Acknowledge all transmissions address to you.


Transmitting Messages

  1. Do not interrupt another person's message.
  2. Identify yourself when talking.
  3. When talking, hold the radio close to your mouth with the antenna vertical.
  4. Speak clearly and slowly.
  5. Use the phonetic alphabet to spell out words.
  6. Keep transmissions short -- about 10 seconds.


Team members who are deaf or hard of hearing will need a radio with assistive technology (e.g., a radio with text messaging capability) or the services of a sign language interpreter.


Monday, April 13, 2015

Treating Drinking Water

If you have doubts about the quality of water, treat it before drinking.

Water Purification
Water can be purified for drinking, cooking and medical use by heating it to a rolling boil for 1 minute or by using water purification tablets or liquid bleach.

Liquid Bleach (unscented)
Following the ratios in the tables below, add bleach to the water and let it stand for 30 minutes.  If the solution does not smell or taste of bleach, add another 6 drops of bleach and let the solution stand for 15 minutes before consuming/using.


These ratios are for normal bleach solutions (4% - 6% chlorine).  Adjust ratios as necessary if using higher concentration solutions.


Use only purified water on wounds.  The use of other solutions(e.g., hydrogen peroxide) on wounds must be the decision of trained medical personnel.


Information obtained from Salt Lake CERT Field Operations Guide.


Saturday, February 7, 2015

Sandbagging

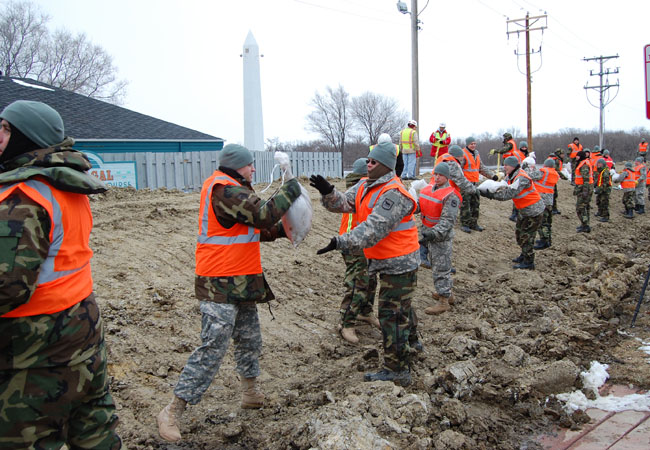
Use sandbags to form barriers that prevent flood water from entering spaces.


Filling Sandbags


  1. Team member 1 holds and empty sandbag open on the ground in front of his or her feet.
  2. Team member 2 empties shovelfuls of sand (or dirt or gravel) into the open bag, until the bag is 1/3 to 2/3 full.
  3. Team member 3 stacks and stockpiles the filled sandbags.


Sandbags do not need to be tied, although they can be tied loosely at the top.  Untied sandbags form a tighter seal when stacked.

For larger operations, bag-holding racks, funnels on the back of trucks and other power-loading equipment (if available) may be used to speed the process.


*******************************


Moving Sandbags

Sandbags are typically moved using a passing line.

To set up a diagonal-passing line:
  1. Team members stand side-by-side in a line.
  2. every second team member takes a small step back.
  3. Unmoved team members turn around to face the members who took a step back.

Use your knees and not your back when lifting sandbags.

When constructing a barrier on an incline, taller team members should be at the end of the line that is farthest from the barrier.


*******************************


Building a Sandbag Barrier


  1. Clear any debris from the area where sandbags are to be placed.
  2. Dig a trench for to six inches deep and two sandbags wide.
  3. Line the trench with heavy duty plastic (poly), extending the plastic across the trench and away from the bottom row of sandbags and toward the water.
  4. Place a row of sandbags length-ways and parallel to the direction of the flow around the edge of the plastic to anchor it.  Overlap sandbags, tucking the open end under the bottom end of the next sandbag.
  5. Stagger the second layer of bags perpendicular to the first layer.  Layer the barrier like a bric wall with each sand bag overlapping the one below by half.
  6. Stamp sandbags firmly into place to eliminate gaps and create a tight seal.
  7. Roll the plastic over the anchoring row of sandbags and anchor again.
  8. Place additional layers of sandbags in alternating directions.
  9. Once the barrier is at the appropriate level, fold the plastic over the top of the barrier and anchor it with extra sandbags.

Barriers more than three layers high should be layered in a pyramid structure using a ratio of 3:1.  For every foot in height, the base must be three feet wide.

Information obtained from Salt Lake CERT Field Operations Guide.


Tuesday, January 20, 2015

Gas Meter and Shutoff Valve


In the event of an emergency, locate the main gas service shutoff valve and shut off the gas.  Main gas shutoff valves are normally located near the gas meter

Outside Meters

  • Gas meters and gas service shutoff valves are usually located on the side or in front of a building.


Cabinet Meters

  • In some cases, gas meters may be located in a cabinet enclosure built into the building or located inside the building, with the shutoff valve located outside on a section of gas pipe next to the building.


Gas Shutoff

  1. Use a non-sparking wrench to turn the valve clockwise one-quarter turn.
  2. Valve is closed when it is crosswise to the pipe

Gas Turn-on

Natural gas flow should only be turned on by a licensed technician


Do not shut off the gas unless you:

            smell gas, hear gas escaping, 
                             see a broken gas line or
                                            suspect a gas leak.


If you are unsure whether a gas meter has a shutoff device, contact the gas service company.

Information obtained from Salt Lake CERT Field Operations Guide.


Saturday, January 3, 2015

Electric Utility ShutOff

Electricity Shutoff

In the event of an electrical emergency, locate the circuit breakers or fuses and shut off the power.


Circuit Box

  1. Switch off individual breakers
  2. Switch off main breaker

Fuse Box

  1. Unscrew and pull out individual fuses
  2. Pull out main fuse block -- Use caution:  metal parts may be hot.


Electricity Turn-on

When turning the power back on turn on the main switch or breaker first, then screw in the fuses or switch on the smaller breakers, one at a time


Do Not Enter a flooded basement or standing water to shut off the electrical supply.  Water conducts electricity and you could be electrocuted.


Information obtained from Salt Lake CERT Field Operations Guide.


Thursday, January 1, 2015

How To Size-Up

Photo from www.ci.richmond.ca.us/index.aspx?NID=2344

Before responding to a disaster, size up the situation.  Size-up is a continual process of examining and evaluation the damage in an environment.  It will enable you to make decisions and respond appropriately in the areas of greatest need.


CERT Size-up Steps

1.  Gather facts
    • What has happened?
    • How many people appear to be involved?
    • What is the current situation

2.  Assess and communicate the damage

    • What has happened?
    • What is happening?
    • What could happen (i.e., how bad could things get)?

3.  Consider probabilities

    • What is likely to happen?
    • What could happen through cascading events?

4.  Assess your own situation
    • Are you in immediate danger?
    • Have you been trained to handle the situation?
    • Do you have the equipment that you need?

5.  Establish priorities

    • Are lives at risk?
    • Can you help?  Remember, life safety is the first priority!

6.  Make decisions

    • Base your decisions on an assessment of the situation and in accordance with the priorities that you established.

7.  Develop a plan of action

    • Create a plan that will achieve your priorities
    • Simple plans may be verbal, but always write down more complex plans.

8.  Take action

    • Execute your plan, documenting any deviations and status changes so that you can report the situation accurately to first responders.

9.  Evaluate progress

    • Evaluate your progress in accomplishing the objectives in your plan of action to determine what is working and what changes you may have to make to stablize the situation.


Information obtained from Salt Lake CERT Field Operations Guide